SOLID Principles with TypeScript
System Design with Design Patterns, Low-Level Design (LLD)
A newer version of the article will be published soon.
1) Single Responsibility Principle
Consider a class called Student
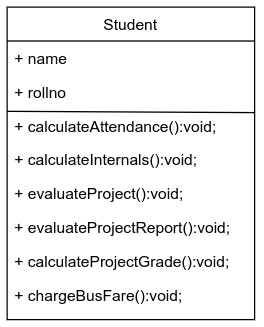
The above student class contains a couple of properties and methods. All of those methods work fine when we create an object and try to use them. Let's see that with an example code
class Student {

    public name: string;
    public rollno: number;

    constructor(name: string, rollno: number) {
        this.name = name;
        this.rollno = rollno;
    }

   calculateAttendance(): void {
        console.log(`Name: ${this.name}, Rollno: ${this.rollno}, Attendance calculated`);
    };

    calculateInternals(): void {
        console.log(`Name: ${this.name}, Rollno: ${this.rollno}, Internals calculated \n\n`);
    };

    evaluateProject(): void {
        console.log(`Name: ${this.name}, Rollno: ${this.rollno}, Project evaluated`);
    };

    evaluateProjectReport(): void {
        console.log(`Name: ${this.name}, Rollno: ${this.rollno}, Project Report evaluated`);
    };

    calculateProjectGrade(): void {
        console.log(`Name: ${this.name}, Rollno: ${this.rollno}, Project grade calculated \n\n`);
    };

    chargeBusFare(): void {
        console.log(`Name: ${this.name}, Rollno: ${this.rollno}, Bus fare calculated`);
    };
}


const student:Student = new Student("David Jose", 1);
student.calculateAttendance();
student.calculateInternals();
student.evaluateProject();
student.evaluateProjectReport();
student.calculateProjectGrade();
student.chargeBusFare();
OUTPUT

However, this violates the Single Responsibility Principle. Let's see what that means. According to the Single Responsibility Principle (SRP), each software module should have only one reason to change. In other words, the classes should be designed in such a way that only one actor should be present or The member functions in a class should be determined by the role. Let's look at an example, which will provide much more clarity. Otherwise, it will be similar to watching Korean movies without subtitles.

Now you can see four classes, right? Simply pay attention to the class names and associated methods. Did you feel anything sus? Hmm!
Let's analyze our four classes
Wait, What's going on, where are all the Student class's member functions? Can you spot them?
Yes! Different classes have been created for them. I understand that being separated is difficult, but in this case, it is beneficial. why? Let's see.
Do you remember this code? Yes, this is from the previous example.
const student:Student = new Student("David Jose", 1);
student.calculateAttendance();
student.calculateInternals();
student. evaluateProject();
student.evaluateProjectReport();
student.calculateProjectGrade();
student.chargeBusFare();
Based on the above code, try to find the answer to the following questions.
Is it the student's responsibility to calculate attendance?
Is it the student's responsibility to calculate the internals?
Is it the student's responsibility to evaluate the project?
Is it the student's responsibility to evaluate the project report?
Is it the student's responsibility to calculate the project marks?
Is it the student's responsibility to charge the college bus fare?
If you answered "no" to all of the above questions, then you are too close to the answer.
Can you imagine such a world where students themself doing these tasks?
So let's get back to the point, let's go through the statements once again. "Each class should only change for one reason", "Each class should have only one actor" or "The methods in a class should be based on the role". What does this mean?
Look at the question and answers below to get an idea of that.
- Who is in charge of calculating student's internals and attendance?
ans) Teachers
- Who is in charge of the calculation and evaluation of the student's projects?
ans) ProjectGuide
- Who is in charge of the charging bus fare for students?
ans) Transport ("I know this isn't a proper name, but it's fine because it's related to the task.")
Can you relate to the four classes after reading these questions and answers? do you? Just give it a shot.
The phrase "Each class should only change for one reason or Each class should have only one actor or The methods in a class should be based on the role" means that responsibility should have been assigned to only the responsible individuals. That is, as shown in the first image, we wrote all of the methods in the Student class. This means that the student should complete all of the tasks. That is not possible in the real world because students lack the authority to do so. This should also be applied to programming as well. As a result, we must first determine the actor/role in order to divide the single class into several classes. Who are the actors in this scene, by the way? Robert Pattinson, Leonardo DiCaprio? Right? No! Who agreed? The actor/role represents the person to whom the methods belong. The term "person" does not necessarily refer to a human being, it could refer to anything, such as a coffee machine or a parking system. In this case, as an example, teachers are responsible for calculating internals and student attendance. So we used the teacher as an actor/role, created a class, and wrote the methods that teachers are responsible for.
The diagram depicts the class that was created based on the actor/role Teacher.
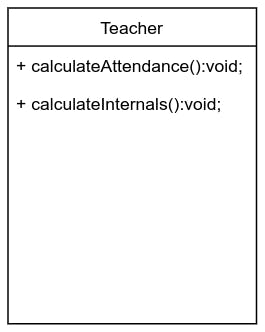
Since there are four actors/roles here, Student, Teacher, ProjectGudie, and Transports, we divided those member functions into different categories based on the actor/role and wrote them in their own separate classes.
The diagram shows the classes created based on actor/role

As we can see, the methods are related to the role rather than the class. This is what the Single Responsibility Principle is all about.
Let's take a look at how our modified code will look after applying the Single Responsibility Principle.
Actor: Student class, with all non-related member functions, removed
class Student {
    public name:string;
    public rollno:number;

    constructor(name:string,rollno:number){
        this.name = name;
        this.rollno = rollno;
    }
}
Actor: Teacher Class and assigned member functions related to the teacher's role
class Teacher {

    calculateAttendance(student:Student): void {
        console.log(`Name: ${student.name}, Rollno: ${student.rollno}, Attendance calculated`);
     };

    calculateInternals(student:Student): void {
        console.log(`Name: ${student.name}, Rollno: ${student.rollno}, Internals calculated \n\n`);

    };

}
Actor: Project Guide Class and assigned member functions related to the project guide's role
class ProjectGuide {
    evaluteProject(student:Student): void {
        console.log(`Name: ${student.name}, Rollno: ${student.rollno}, Project evaluated`);
    };

    evaluteProjectReport(student:Student): void {
        console.log(`Name: ${student.name}, Rollno: ${student.rollno}, Project Report evaluated`);
    };

    calculateProjectGrade(student:Student): void {
        console.log(`Name: ${student.name}, Rollno: ${student.rollno}, Project grade calculated \n\n`);
    };
}
Actor: Transport Class and assigned member functions related to the role of the Transport
class Transports {
    chargeBusFare(student:Student): void {
        console.log(`Name: ${student.name}, Rollno: ${student.rollno}, Bus fare calculated`);
    };
}
Driver Code
We have separate classes for each actor here. To complete the task assigned to each actor, we simply need to pass a student object to each of the class methods. They will complete the remaining tasks. Isn't it now very simple? Let's see how this works
Create an object for the Student class
const student:Student = new Student("David Jose",1);
Let's get started on the attendance and internal calculations. Make an instance of the Teacher class so that we can access the methods. Then, pass the student object to its member functions.
const teacher: Teacher = new Teacher();

teacher.calculateAttendance(student);
teacher.calculateInternals(student);
OUTPUT

To evaluate the project, repeat the previous steps: create an instance of the responsible actor, in this case, the project guide, and then pass the student instance to the member functions of the ProjectGuide Class.
const project = new ProjectGuide();

project.evaluteProject(student);
project.evaluteProjectReport(student);
project.calculateProjectGrade(student);
OUTPUT

The same goes for transport class as well.
const bus = new Transports();

bus.chargeBusFare(student);

FULL CODE
class Student {
    public name:string;
    public rollno:number;

    constructor(name:string,rollno:number){
        this.name = name;
        this.rollno = rollno;
    }
}


class Teacher {

    calculateAttendance(student:Student): void {
        console.log(`Name: ${student.name}, Rollno: ${student.rollno}, Attendance calculated`);
     };

    calculateInternals(student:Student): void {
        console.log(`Name: ${student.name}, Rollno: ${student.rollno}, Internals calculated \n\n`);

    };

}

class ProjectGuide {
    evaluteProject(student:Student): void {
        console.log(`Name: ${student.name}, Rollno: ${student.rollno}, Project evaluated`);
    };

    evaluteProjectReport(student:Student): void {
        console.log(`Name: ${student.name}, Rollno: ${student.rollno}, Project Report evaluated`);
    };

    calculateProjectGrade(student:Student): void {
        console.log(`Name: ${student.name}, Rollno: ${student.rollno}, Project grade calculated \n\n`);
    };
}

class Transports {
    chargeBusFare(student:Student): void {
        console.log(`Name: ${student.name}, Rollno: ${student.rollno}, Bus fare calculated`);
    };
}

/*

 * For the student, we have created an object

*/

const student:Student = new Student("David Jose",1);

/*

    * The student object is passed to the Teacher class
     in order to calculate internals and attendance

*/
const teacher: Teacher = new Teacher();
teacher.calculateAttendance(student);
teacher.calculateInternals(student);

/*

    * The student object is passed to the ProjectGuide class
     in order to evalute and calculate the grade

*/
const project = new ProjectGuide();
project.evaluteProject(student);
project.evaluteProjectReport(student);
project.calculateProjectGrade(student);

/*

    * The student object is passed to the Transport class
     in order to charge bus fare

*/
const bus = new Transports();
bus.chargeBusFare(student);
It is important to note that each class should have only one reason to change. This does not mean that it should have only one method, it can have one or more, but all should be based solely on the actor/role.
2) Open/ Close Principle
This is the second principle in SOLlD called the Open/Close Principle. According to the open-closed principle (OCP), "software entities (classes, modules, functions, etc.) should be open for extension but closed for modification", that is, such an entity's behavior can be extended without modifying its source code.
When we say "open for extension," we mean that we should use inheritance whenever we want to add new functionality to the modules/classes.
Closed for modification" means that whenever we want to add a new feature, we should not make any changes to the original module/classes unless it is a bug fix.
Consider an example of a juice maker
class Apple{
    public type:string;
    constructor(type:string){
        this.type =type;
    }
}

class Orange{
    public type:string;
    constructor(type:string){
        this.type =type;
    }
}

class JuiceMaker{

    makeAppleJuice(apple:Apple){
        console.log(`Making Apple Juice, Apple type: ${apple.type}`)
    }

    makeOrangeJuice(orange:Orange){
        console.log(`Making Orange Juice, Orange type: ${orange.type}  `);

    }


}
Here we have a class with two methods called "makeAppleJuice" and "makeOrangeJuice". To make the juice we create an object for it and call the methods like the example given below
const juicemaker:JuiceMaker = new JuiceMaker();

juicemaker.makeAppleJuice(new Apple("Jonagold"));
juicemaker.makeAppleJuice(new Orange("Mandarin"));
OUTPUT

In the above example, everything seems fine, But according to the Open/Close principle, this is a violation, How?
Suppose, I badly wish to have grape juice, how can I make a grae juice here?
First, I need to have grape class
class Grape{
    public type:string;
    constructor(type:string){
        this.type =type;
    }
}
Now I want to add a method which make thegrape juice.
class JuiceMaker{

    makeAppleJuice(apple:Apple){
        console.log(`Making Apple Juice, Apple type: ${apple.type}`)
    }

    makeOrangeJuice(orange:Orange){
        console.log(`Making Orange Juice, Orange type: ${orange.type}  `);

    }

    makeGrapeJuice(grape:Grape){
        console.log(`Making Grape Juice, Grape type: ${grape.type}  `);

    }


}
Now let's call this method
const juicemaker:JuiceMaker = new JuiceMaker();

juicemaker.makeGrapeJuice(new Grape("Concord"))
OUTPUT

We already studied that, A module/class should be closed for modification,To make orange and grape juice in this example, we need to add methods to the JuiceMaker class. That is, we modified the JuiceMaker class. But also one major important point, while you implement one principle, is that you shouldn't violate the rest of the principles. By including the makeOrangeJuice and makeGrapeJuice methods, we have already violated the Single Responsibility Principle. How? Apple, Orange, and Grape are different fruits with different personalities that should be treated separately. In real life, when we make apple juice, we should at least wash our juice jar before making another fruit juice, right? That's all. So how can we avoid modifying the main class? We require an interface for that.
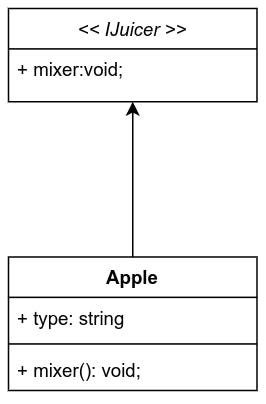
Diagram of our interface
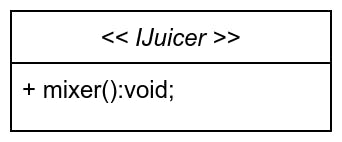
interface IJuicer{
     mixer():void;
}
Remember the second point "Open for extension"? Yes, we are now going to implement this interface wherever we want, so in this example, what we are going to do that, we want to make apple juice. We will create an Apple class and implement the interface for it.
class Apple implements IJuicer {
    public type: string;
    constructor(type: string) {
        this.type = type;
    }

    mixer(): void {
        console.log(`Making Apple Juice, Apple type: ${this.type}`)
    }
}
Let's see the diagram for this.
Now let's add JuiceMaker class and use the interface for accesing the method.
class JuiceMaker{
    makeJuice(fruit:IJuicer){
        fruit.mixer();
    }
}
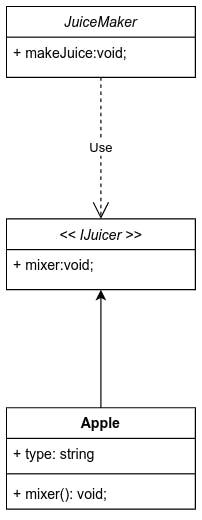
In here, the juicemaker class is dependent on the IJuicer interface. Hence, we can refer to the mixer method as a common method. That is, when we pass an object to these methods, if the object has a mixer method, it will be automatically called here. Because the class that created the object implements the same IJuicer interface that the Juicemaker class depended on. Let's see the diagram.
Now let's create an object for the JuiceMaker class and call the makeJuice method.
function main(){

const juicemaker:JuiceMaker = new JuiceMaker();

  juicemaker.makeJuice(new Apple("Jonagold"));
}


main();
OUTPUT

So, what is the point of this? Are we complicating things too much by including interfaces and extra classes? Not. It will make sense from now on. Now we are going to make an orange juice. Previously, we altered the class by adding a new method for making orange juice. But not in this case. Let's take a look at how that goes.
Here we will make Orange juice, for which we will create a new class that implements the IJuicer interface.
class Orange implements IJuicer{
    public type:string;
    constructor(type:string){
        this.type =type;
    }

    mixer(): void {
         console.log(`Making Orange Juice, Orange type: ${this.type}`)
    }
}
So what now? The same procedure we used to make apple juice. Go to the main function and call the makeJuice method from the JuicerMaker class. Pass the object that we created from Orange class. Simple, right?
function main(){

const juicemaker:JuiceMaker = new JuiceMaker();
  juicemaker.makeJuice(new Apple("Jonagold"));
  juicemaker.makeJuice(new Orange("Mandarin"));
}


main();
As you can see, we did not alter any of the classes did't add any new member functions to make an orange juice. That's what "close for modification" is all about. Here, the JuiceMaker class has just one method that will deal with the production of various fruit juices.
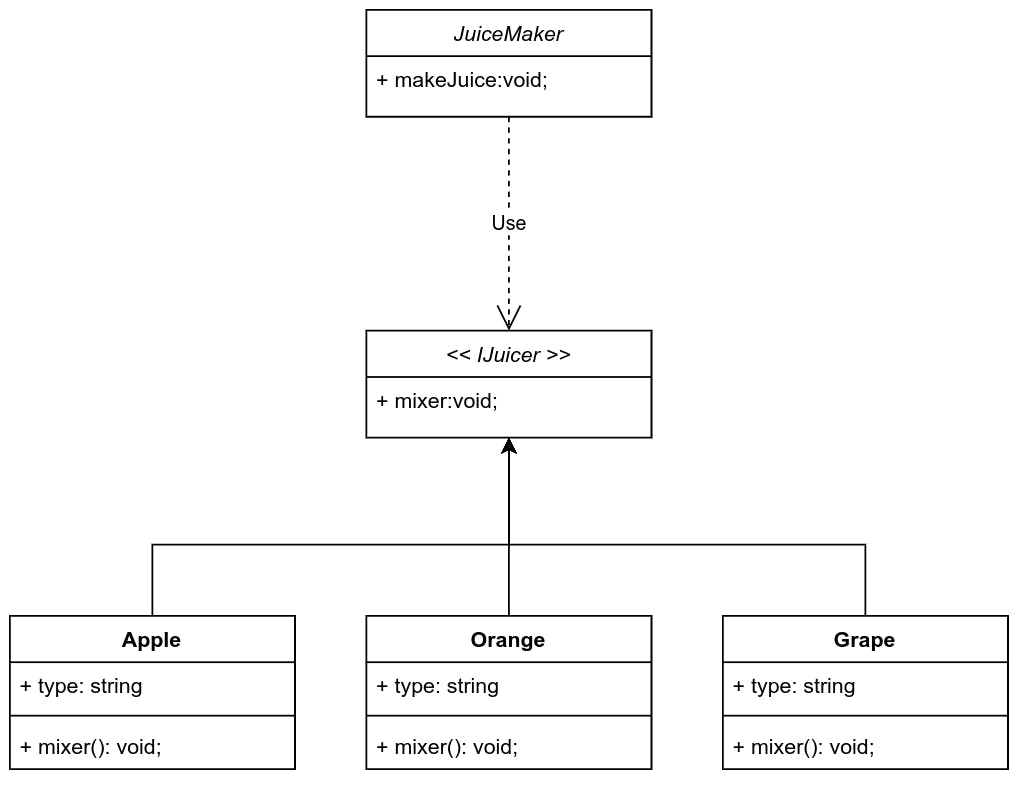
We can make n number of different type of juices without changing the existing code. But now you may think that we changed the main function by adding new method calling? yes, we changed the main function, but you have to think that we have to call these methods somewhere, right? That's it.
If we want grape juice, we follow the same procedure as shown in the diagram below.
FULL CODE
Please keep in mind that each code block has its own code file.
//IJuicer.ts
export default interface IJuicer{
     mixer():void;
}
//JuiceMaker.ts
import IJuicer from "./IJuicer";

export default class JuiceMaker{
    makeJuice(fruit:IJuicer){
        fruit.mixer();
    }
}
//Apple.ts
import IJuicer from "./IJuicer";

export default class Apple implements IJuicer {
    public type: string;
    constructor(type: string) {
        this.type = type;
    }

    mixer(): void {
        console.log(`Making Apple Juice, Apple type: ${this.type}`)
    }

}
//Orange.ts
import IJuicer from "./IJuicer";

export default class Orange implements IJuicer {
    public type: string;
    constructor(type: string) {
        this.type = type;
    }

    mixer(): void {
        console.log(`Making Orange Juice, Orange type: ${this.type}`)
    }


}
//Grape.ts
import IJuicer from "./IJuicer";

export default class Grape implements IJuicer {
    public type: string;
    constructor(type: string) {
        this.type = type;
    }

    mixer(): void {
        console.log(`Making Grape Juice, Grape type: ${this.type}`)
    }

}
//Main.ts
import Apple from "./Apple";
import Grape from "./Grape";
import JuiceMaker from "./JuiceMaker";
import Orange from "./Orange";


function main() {

  const juicemaker: JuiceMaker = new JuiceMaker();

  juicemaker.makeJuice(new Apple("Jonagold"));
  juicemaker.makeJuice(new Orange("Mandarin"));
  juicemaker.makeJuice(new Grape("Concord"));

}


main();
OUTPUT

3) Liskov Substitution Principle
The Liskov substitution principle states that if the child object cannot be replaced by it's parent object, then it violates the Liskov Substitution Principle. You shouldn't do an inheritance if it violates the principle. Let's see that in detail so that it makes more sense.
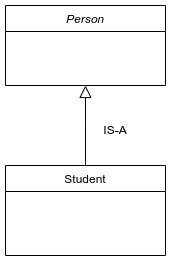
When applying inheritance, we typically only check that is the child class satisfies the " IS-A" relationship with the parent, but the Liskov Substitution Principle says that it is not enough.
Let's see an example
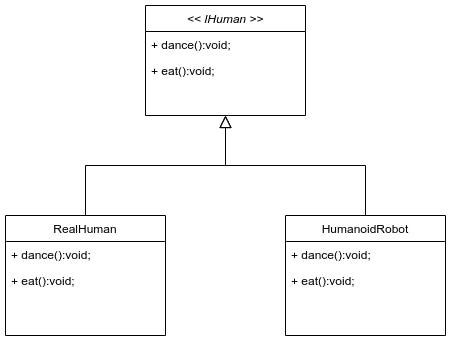
In the preceding example, both classes obey the "IS-A" relationship with a parent, that is, RealHunam and HumanoidRobot are both types of human. But what happens when the program runs? let's see the code and analyze the output.
interface IHuman{
    dance():void;
    eat():void;
}


class RealHuman implements IHuman{
    dance(): void {
          console.log("Real Human dancing");
    }
    eat(): void {
         console.log('Real Human eating');

    }

}

class HumanoidRobot implements IHuman{
    dance(): void {
            console.log("Humanoid Robot dancing");
    }
    eat(): void {
        throw new Error("Humanoid Robot can't eat");
    }


}


function Main(){

    const human:IHuman =  new RealHuman();
    human.dance();
    human.eat();


    const robot:IHuman = new HumanoidRobot();
    robot.dance();
    robot.eat();


}


Main();
OUTPUT

We can see here that the humanoid robot cannot eat food, hence it throws an error. This implies that, even after forming an IS-A relationship with the parent, the child continues to disobey the parent. Because the robot is unable to consume food. As a result, the principle is broken here, despite the fact that both are humans and satisfy the "IS-A" relationship.If the parent can replace the child, then only the child become an ideal child. Actually, this is a problem part. The solution for the Liskov Substitution Principle is the Interface Segregation Principle.
FULL CODE
//IHuman.ts
export default interface IHuman{
    dance():void;
    eat():void;
}
//RealHuman.ts
import IHuman from "./IHuman";

export default class RealHuman implements IHuman{
    dance(): void {
        console.log("Real Human dancing");

    }
    eat(): void {
        console.log('Real Human eating');

    }

}
import IHuman from "./IHuman";

export default class HumanoidRobot implements IHuman{
    dance(): void {
       console.log("Humanoid Robot dancing");

    }
    eat(): void {
        throw new Error("Humanoid Robot can't eat");
    }

}
//Main.ts
import HumanoidRobot from "./HumanoidRobot";
import IHuman from "./IHuman";
import RealHuman from "./RealHuman";

function Main(){

    const human:IHuman =  new RealHuman();
    human.dance();
    human.eat();


    const robot:IHuman = new HumanoidRobot();
    robot.dance();
    robot.eat();


}


Main();
4) Interface Segregation Principle
The interface segregation principle says that the client should not be forced to implement interfaces that they don't use. Consider the example from the previous code itself.
Example from previous code
 /* The client is forced to implement all the methods from IHuman interfaces,that client class not use. */
class HumanoidRobot implements IHuman{
    dance(): void {
         console.log('Humanoid robot dancing')
    }
    eat(): void {
        throw new Error("Humanoid robot can't eat");
    }


}
Let's take a look at the code above. We can see here that the HumanoidRobot forcibly implemented the eat method defined in the IHuman interface. Since the robot can't eat, those methods are unnecessary implemented. As a result, we must remove the eat method from the Humanoid robot.
Accodring to the ISP. The key point to note is that interfaces are meant to be minimal. If the interfaces have a lot of method declarations, we need to divide those into multiple small interfaces, otherwise, the classes which implement the interfaces need to do all the tasks provided in the interfaces which they don't even want to do.
We created an additional interface to reduce the load on the single interface. As a result, the classes are not required to fully implement all of the methods.
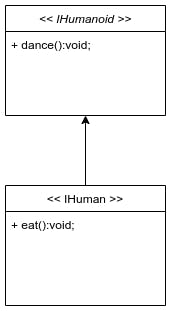
The diagram of two interfaces and how they related shown below
interface IHumanoid{
    dance():void;
}

interface IHuman extends IHumanoid{
    eat():void;
}
We've made two interfaces here. The IHumanoid robot now only contains the dance method. But because our IHuman requires both methods, we inherited the IHumanoid interface.
Now the Humanoid Robot class only have to implement the dance method
//This class only implementing neccesary methods only.
class HumanoidRobot implements IHumanoid{
    dance(): void {
         console.log('Humanoid robot dancing')
    }
}
Here the Real Human class implements both methods from both interfaces. Because the IHuman interface inherits the dance method from the IHumanoidRobot interface.
//This class implementing all the methods
class RealHuman implements IHuman{
    dance(): void {
        console.log('Real human dancing')
    }
    eat(): void {
        console.log('Real human eating');

    }

}
The driver code shows that the Humaoid can only call the dance method, whereas Real Human can call both methods. As a result, the client is not required to implement methods that they do not use. Now it obeys Interface Segregation Principle
Driver Code
function Main(){

    const human:IHuman =  new RealHuman();
    human.dance();
    human.eat();


    const humanoidRobot:IHumanoid = new HumanoidRobot();
    humanoidRobot.dance()


}


Main();
FULL CODE
//IHumanoid.ts
import IHumanoid from "./IHumanoid";

export default class HumanoidRobot implements IHumanoid{
    dance(): void {
       console.log("Humanoid Robot dancing");

    }

}
//IHuman.ts
import IHumanoid from "./IHumanoid";

export default interface IHuman extends IHumanoid{
    eat():void;
}
import HumanoidRobot from "./HumanoidRobot";
import IHuman from "./IHuman";
import IHumanoid from "./IHumanoid";
import RealHuman from "./RealHuman";

function Main(){

    const human:IHuman =  new RealHuman();
    human.dance();
    human.eat();


    const humanoidRobot:IHumanoid = new HumanoidRobot();
    humanoidRobot.dance()


}


Main();
5) Dependency Inversion Principle
The Dependency Inversion Principle (DIP) states that high-level modules should not depend on low-level modules, both should depend on abstraction. Abstraction should not depend on details. Details should depend upon abstraction.
Why do we need abstraction? Because knowing explicitly about the design and implementation of other classes increases the risk that changes to one class will break the other classes.
We must keep high-level and low-level modules/classes as loosely coupled as possible. As a result, instead of knowing each other, we must make both of them rely on abstraction.
Let's start with normal tightly coupled modules and then see how the model looks after applying Dependency Inversion Principle.
class Doctor {
    public name: string;
    public specialization: string;
    constructor(name: string, specialization: string) {
        this.name = name;
        this.specialization = specialization;
    }
}

class Nurse {
    public name: string;
    public experience:number;

    constructor(name:string,experience:number){
        this.name = name;
        this.experience = experience;
    }
}

class Receptionist {
    public name: string;
    public experience:number;

    constructor(name:string,experience:number){
        this.name = name;
        this.experience = experience;
    }
}

class AmbulanceDriver {
    public name: string;
    public experience:number;

    constructor(name:string,experience:number){
        this.name = name;
        this.experience = experience;
    }
}


//Tightly Coupled
class HospitalManagement{

    doctor = new Doctor('David','Oncology');
    nurse = new Nurse('Therese',10);
    receptionist = new Receptionist('Nimisha',9);
    ambulanceDriver = new AmbulanceDriver('Jhon',7);


    hireDoctor(){
        console.log(`Doctor: ${this.doctor.name}, Specialization ${this.doctor.specialization} is hired`);
    }

    hireNurse(){
        console.log(`Nurse: ${this.nurse.name}, Experience: ${this.nurse.experience} is hired`);
    }
    hireReceptionist(){
        console.log(`Receptionist: ${this.receptionist.name}, Experience: ${this.receptionist.experience} is hired`);
    }
    hireAmbulanceDriver(){
        console.log(`Ambulance Driver: ${this.ambulanceDriver.name}, Experience: ${this.ambulanceDriver.experience} is hired`);
    }


}


const hospital:HospitalManagement = new HospitalManagement();

hospital.hireDoctor();
hospital.hireNurse();
hospital.hireReceptionist();
hospital.hireAmbulanceDriver();
In the above code, can you find out how many principles are violated here?
Single Responsibility Principle
Open/ Close Principle
Why did I say it is a violation of the SRP? We wrote different roles in the same class, but according to the SRP definition, a class should only contain one role. We can see that there are many roles in this single class. The next section is about OCP, if we want to add a new method, we must modify the HostpitalManagement class. Therefore, it has already violated two other principles.
So, how can we modify this code so that it obeys DIP without violating other principles? We're using the same example we used for OCP here. But don't be confused, even though the examples are similar, the meaning is not.
According to the DIP, higher-level classes should not rely on lower-level classes. Both should depend on Abstraction. We could use an interface for Abstraction.
interface IHospitalManagement{
    hirePeople():void;
}
Now create the classes for Candidates (Lower Level Classes) and implement the interface.
class Doctor implements IHospitalManagement{
    hirePeople(): void {
        console.log("Management hired Doctor");

    }

}
class Nurse implements IHospitalManagement{
    hirePeople(): void {
        console.log("Management hired Nurse");

    }

}
class Receptionist implements IHospitalManagement{
    hirePeople(): void {
        console.log("Management hired Receptionist");

    }

}
class AmbulanceDriver implements IHospitalManagement{
    hirePeople(): void {
        console.log("Management hired Ambulance driver");

    }

}
You may be wondering why we are doing this. right? According to the definition, lower-level classes should depend on Abstraction. The candidate classes in this case are the lower-level classes. As a result of implementing the interface "IHospitalManagement," the candidate classes becomes dependent on the interface (Abstraction). Congratz, we solved one part of the principle.
Let's see the diagram of how our Lower level Class depends on the interface (Abstraction)
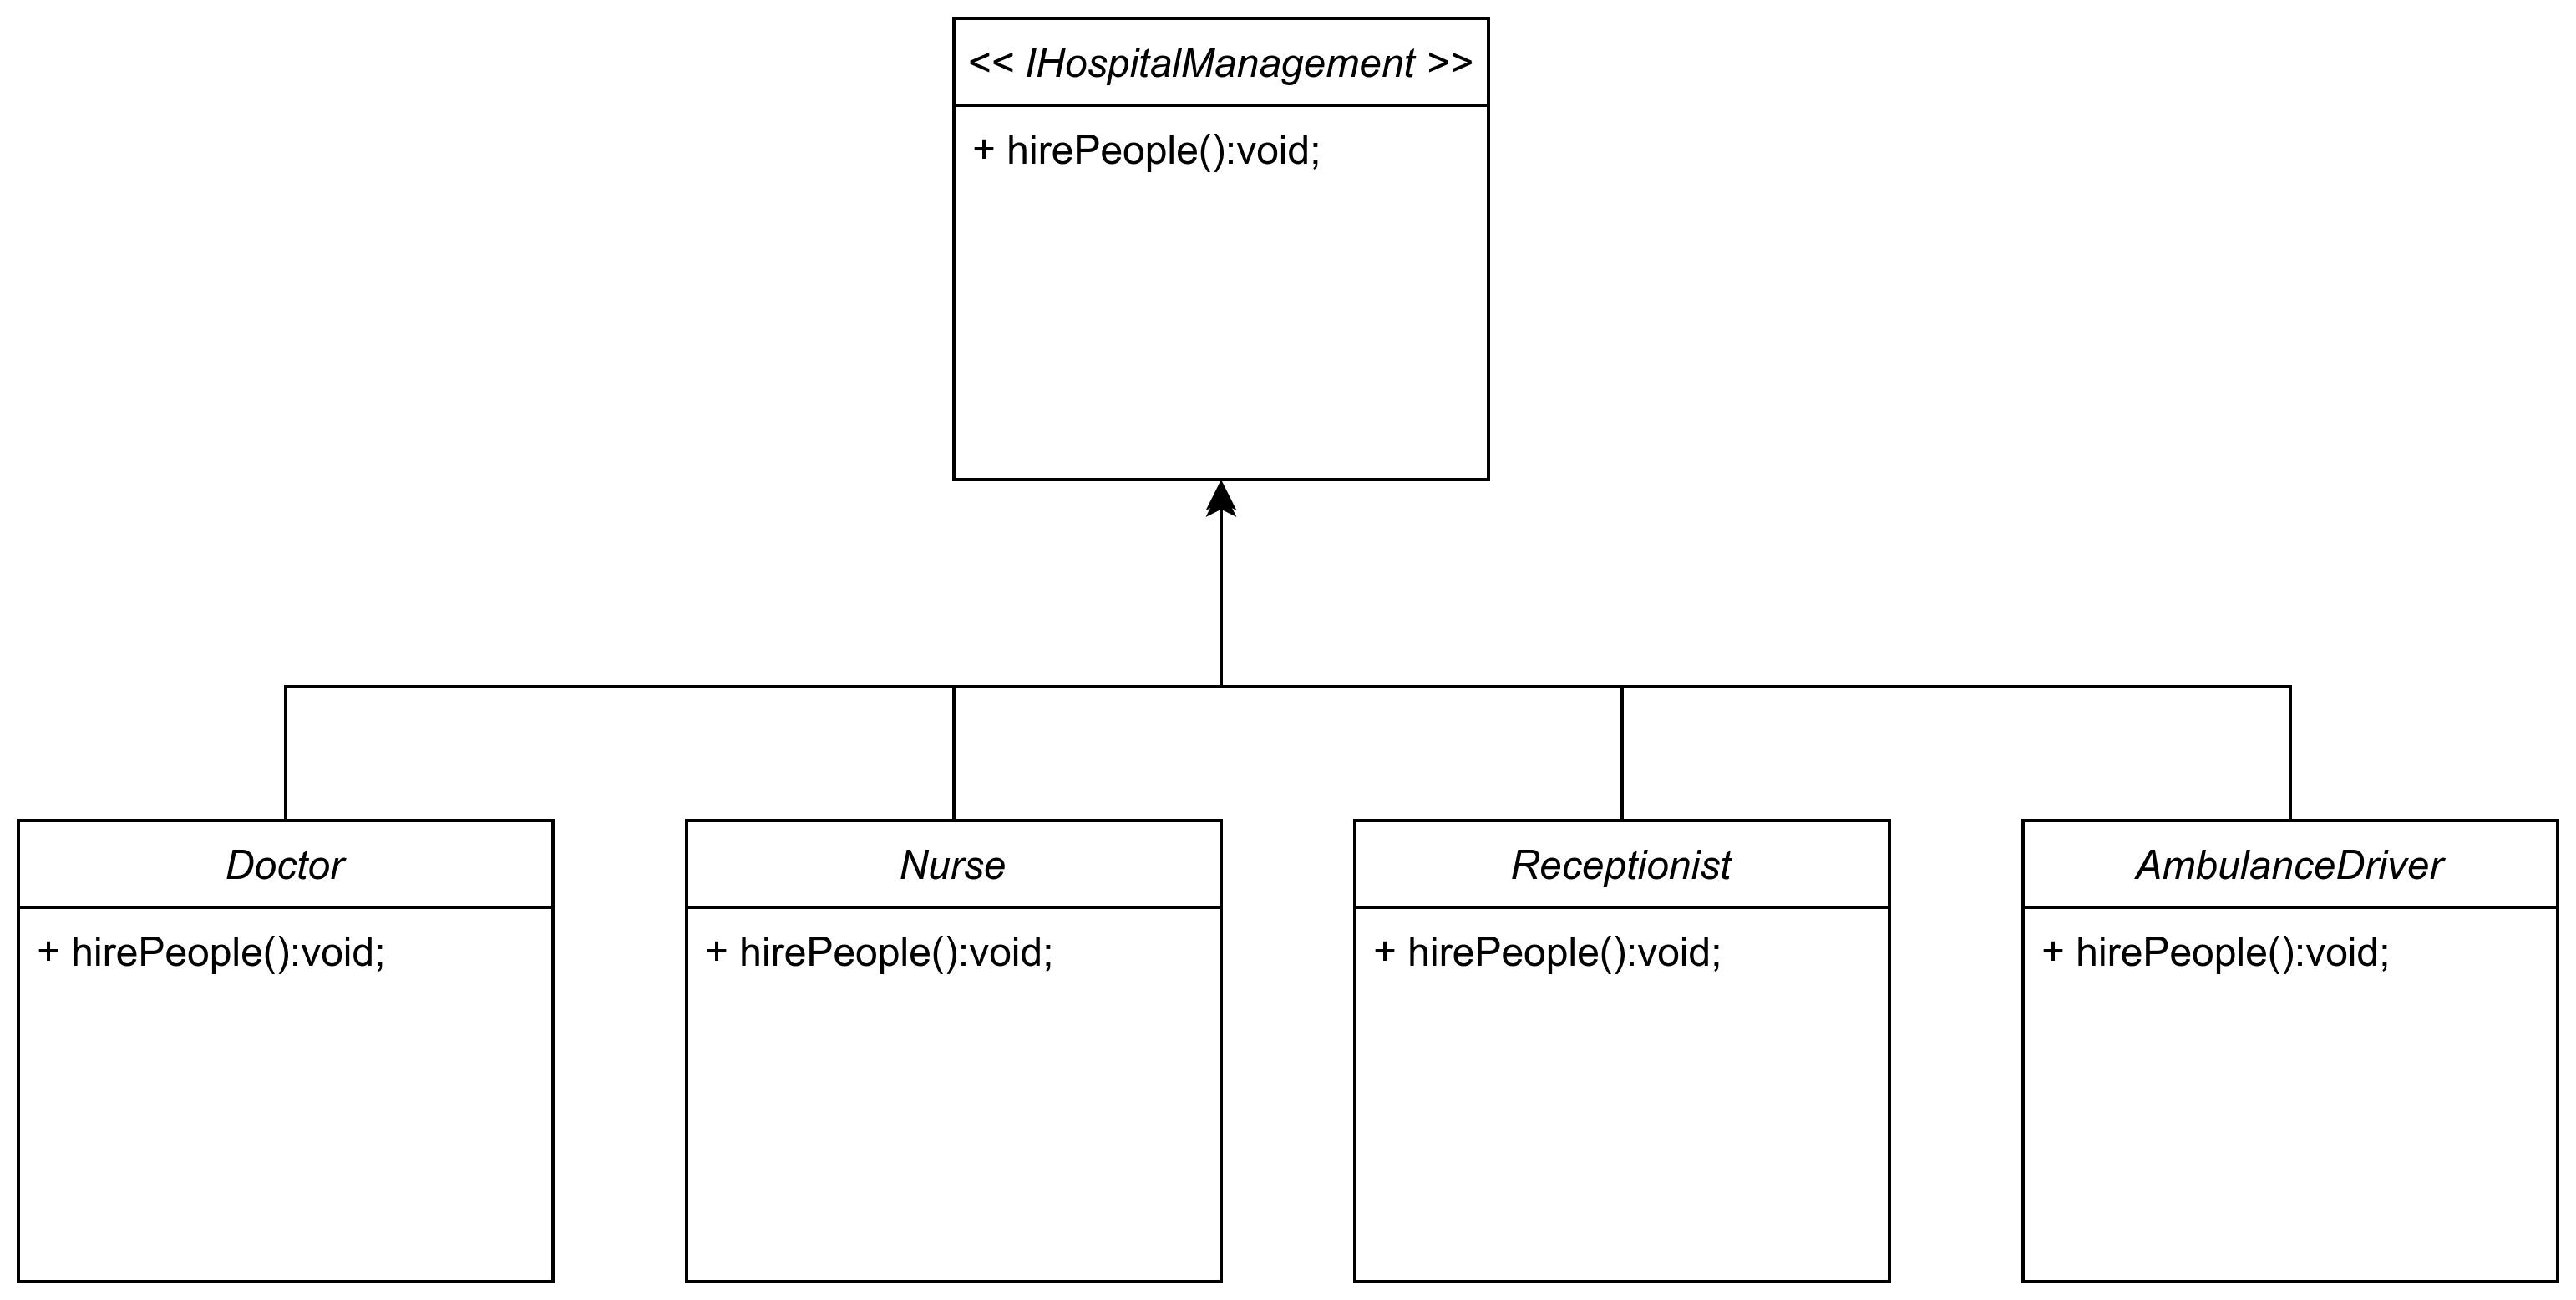
We now require a class with the responsibility of hiring these candidates. That class serves as our higher-level class, and we must make it dependent on abstraction. Create a higher-level class called Management with the member function "startHiring".
class Management{
    startHiring(){

    }
}
We must now make this Management class dependent on the interface (Abstraction). Make the parameter a type of interface (Abstraction) in order to use the method defined in the interface.
class Management{

    startHiring(candidate:IHospitalManagement){
        candidate.hirePeople();
    }
}
Here, we have a parameter called candidate, which is a type of Interface. Now we pass an object of the same type. As a result, this Management class is dependent on the interface. Because, as you can see, the hirePeople method only works when we pass an object of type interface "IHospitalManagement," otherwise it throws an error. So it is a "use" dependency here. The Management class makes use of the interface. As a result, we can say that the Management class is dependent on the "IHospitalManagement" interface.
The Final Diagram
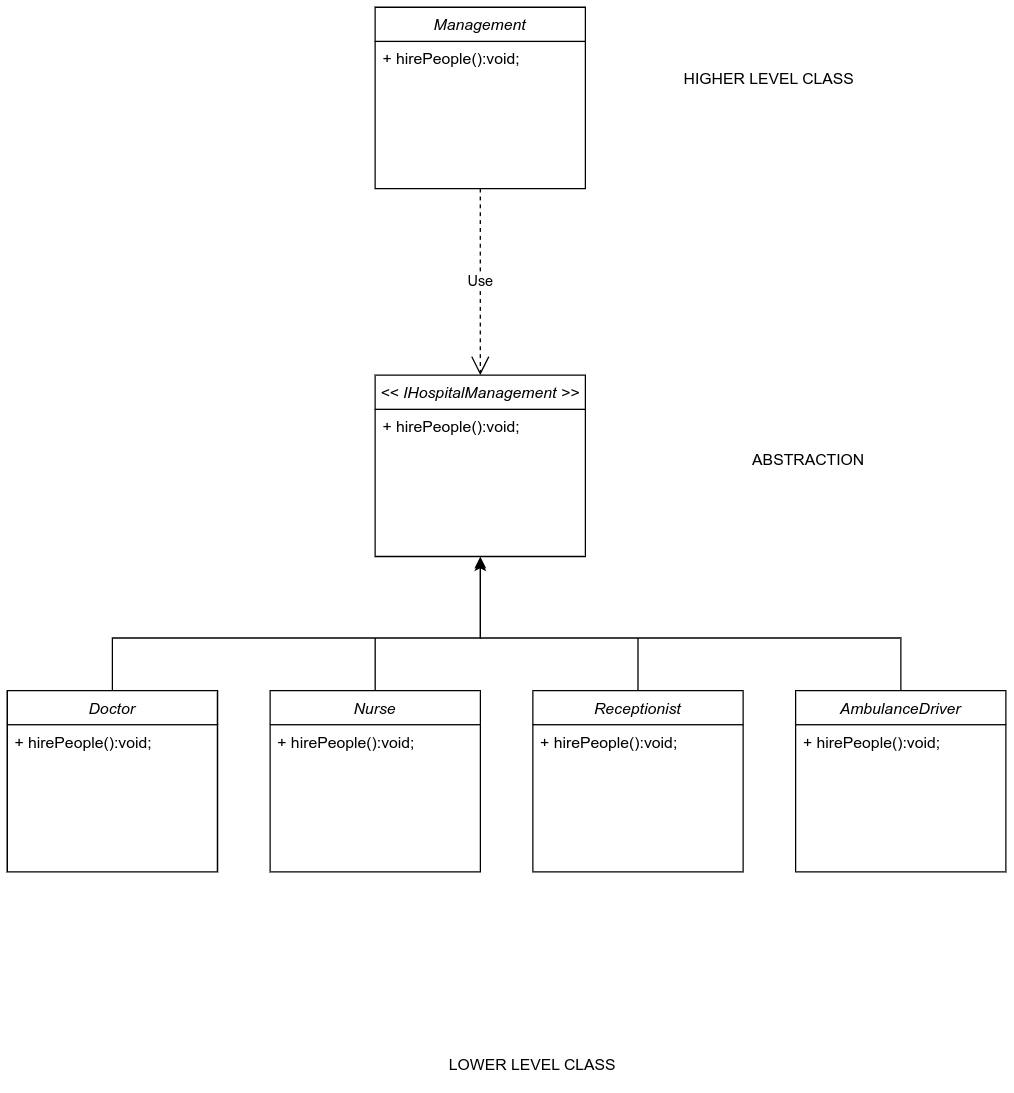
The diagram above depicts the complete structure of the code. Here you can see how the higher-level class and lower-level class are both dependent on Abstraction.
Let's now begin hiring the candidates. Create a function called Main. As we all know, the Management class has a method called startHiring. When we pass an object to this method, it will automatically call the hirePeople method that is bound to that object.
We can hire n number of candidates without affecting any of the other classes.
function Main(){

    const hospital:Management = new Management();
    hospital.startHiring(new Doctor());
    hospital.startHiring(new Nurse());
    hospital.startHiring(new Receptionist());
    hospital.startHiring(new AmbulanceDriver());


}


Main();
OUTPUT

FULL CODE
//IHospitalManagement.ts
export default interface IHospitalManagement{
    hirePeople():void;
}
//Doctor.ts
import IHospitalManagement from "./IHospitalManagement";

export default class Doctor implements IHospitalManagement{
    hirePeople(): void {
        console.log("Management hired Doctor");

    }

}
//Nurse.ts
import IHospitalManagement from "./IHospitalManagement";

export default class Nurse implements IHospitalManagement{
    hirePeople(): void {
        console.log("Management hired Nurse");

    }

}
//Receptionist.ts
import IHospitalManagement from "./IHospitalManagement";

export default class Receptionist implements IHospitalManagement{
    hirePeople(): void {
        console.log("Management hired Receptionist");

    }

}
//AmbulanceDriver.ts
import IHospitalManagement from "./IHospitalManagement";

export default class AmbulanceDriver implements IHospitalManagement{
    hirePeople(): void {
        console.log("Management hired Ambulance driver");

    }

}
//Management.ts
import IHospitalManagement from "./IHospitalManagement";

export default class Management{

    startHiring(candidate:IHospitalManagement){
        candidate.hirePeople();
    }
}
//Main.ts
import  Management  from "./Management";
import Doctor from "./Doctor";
import Nurse from './Nurse';
import Receptionist from './Receptionist';
import AmbulanceDriver from './AmbulanceDriver';


function Main(){

    const hospital:Management = new Management();
    hospital.startHiring(new Doctor());
    hospital.startHiring(new Nurse());
    hospital.startHiring(new Receptionist());
    hospital.startHiring(new AmbulanceDriver());


}


Main();
Happy Learning...
